
Projects
- Starting Out
- When defining your project, the order in which you place instructions matter.
- The Directory Structure
- Naming And Finding Projects
- Running Project Tasks
- Setting Project Properties
- Resolving Paths
- Defining The Project
- Writing Your Own Tasks
Starting Out
In Java, most projects are built the same way: compile source code, run test cases, package the code, release it. Rinse, repeat.
Feed it a project definition, and Buildr will set up all these tasks for you. The only thing you need to do is specify the parts that are specific to your project, like the classpath dependencies, whether you’re packaging a JAR or a WAR, etc.
The remainder of this guide deals with what it takes to build a project. But first, let’s pick up a sample project to work with. We’ll call it killer-app:
require "buildr/openjpa"

include Buildr::OpenJPA

VERSION_NUMBER = '1.0'

AXIS2 = 'org.apache.axis2:axis2:jar:1.2'
AXIOM = group('axiom-api', 'axiom-impl', 'axiom-dom',
  :under=>'org.apache.ws.commons.axiom', :version=>'1.2.4')
AXIS_OF_WS = [AXIOM, AXIS2]
OPENJPA = ['org.apache.openjpa:openjpa:jar:1.2.0',
  'net.sourceforge.serp:serp:jar:1.12.0']

repositories.remote << 'http://www.ibiblio.org/maven2/'

desc 'Code. Build. ??? Profit!'
define 'killer-app' do

  project.version = VERSION_NUMBER
  project.group = 'acme'
  manifest['Copyright'] = 'Acme Inc (C) 2007'
  compile.options.target = '1.5'

  desc 'Abstract classes and interfaces'
  define 'teh-api' do
    package :jar
  end

  desc 'All those implementation details'
  define 'teh-impl' do
    compile.with AXIS_OF_WS, OPENJPA
    compile { open_jpa_enhance }
    package :jar
  end

  desc 'What our users see'
  define 'la-web' do
    test.with AXIS_OF_WS
    package(:war).with :libs=>projects('teh-api', 'teh-impl')
  end

  javadoc projects
  package :javadoc

end
A project definition requires four pieces of information: the project name, group identifier, version number and base directory. The project name … do we need to explain why its necessary? The group identifier and version number are used for packaging and deployment, we’ll talk more about that in the Packaging section. The base directory lets you find files inside the project.
Everything else depends on what that particular project is building. And it all goes inside the project definition block, the piece of code that comes between define <name> .. do and end.
Order is important
When defining your project, the order in which you place instructions matter.
For example, the project below will not pick up resources because they are defined after the package instruction.
define 'testwar' do
project.version = 1.0
package(:war)
project.resources.from(_('src/main/java')).exclude('*.java')
end
The Directory Structure
Buildr follows a convention we picked from years of working with Apache projects.
Java projects are laid out so the source files are in the src/main/java directory and compile into the target/classes directory. Resource files go in the src/main/resources directory, and copied over to target/resources. Likewise, tests come from src/test/java and src/test/resources, and end life in target/test/classes and target/test/resources, respectively.
WAR packages pick up additional files from the aptly named src/main/webapp. And most stuff, including generated source files are parked under the target directory. Test cases and such may generate reports in the, you guessed it, reports directory.
Other languages will use different directories, but following the same general conventions. For example, Scala code compiles from the src/main/scala directory, RSpec tests are found in the src/test/rspec directory, and Flash will compile to target/flash. Throughout this document we will show examples using mostly Java, but you can imagine how this pattern applies to other languages.
When projects grow big, you split them into smaller projects by nesting projects inside each other. Each sub-project has a sub-directory under the parent project and follows the same internal directory structure. You can, of course, change all of that to suite your needs, but if you follow these conventions, Buildr will figure all the paths for you.
Going back to the example above, the directory structure will look something like this:
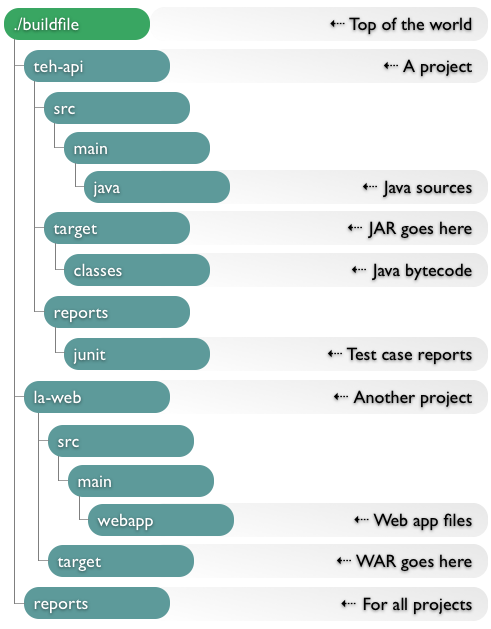
Notice the buildfile at the top. That’s your project build script, the one Buildr runs.
When you run the buildr command, it picks up the buildfile (which here we’ll just call Buildfile) from the current directory, or if not there, from the closest parent directory. So you can run buildr from any directory inside your project, and it will always pick up the same Buildfile. That also happens to be the base directory for the top project. If you have any sub-projects, Buildr assumes they reflect sub-directories under their parent.
And yes, you can have two top projects in the same Buildfile. For example, you can use that to have one project that groups all the application modules (JARs, WARs, etc) and another project that groups all the distribution packages (binary, sources, javadocs).
When you start with a new project you won’t see the target or reports directories. Buildr creates these when it needs to. Just know that they’re there.
Naming And Finding Projects
Each project has a given name, the first argument you pass when calling define. The project name is just a string, but we advise to stay clear of colon (:) and slashes (/ and \), which could conflict with other task and file names. Also, avoid using common Buildr task names, don’t pick compile, build or any existing task name for your project name.
Since each project knows its parent project, child projects and siblings, you can reference them from within the project using just the given name. In other cases, you’ll need to use the full name. The full name is just parent:child. So if you wanted to refer to teh-impl, you could do so with either project('killer-app:teh-impl') or project('killer-app').project('teh-impl').
The project method is convenient when you have a dependency from one project to another, e.g. using the other project in the classpath, or accessing one of its source files. Call it with a project name and it will return that object or raise an error. You can also call it with no arguments and it will return the project itself. It’s syntactic sugar that’s useful when accessing project properties.
The projects method takes a list of names and returns a list of projects. If you call it with no arguments on a project, it returns all its sub-projects. If you call it with no argument in any other context, it returns all the projects defined so far.
Let’s illustrate this with a few examples:
puts projects.inspect
=> [project("killer-app"), project("killer-app:teh-api") ... ]

puts project('killer-app').projects.inspect
=> [project("killer-app:teh-api"), project("killer-app:teh-impl") ... ]

puts project('teh-api')
=> No such project teh-api

puts project('killer-app:teh-api').inspect
=> project("killer-app:teh-api")

puts project('killer-app').project('teh-api').inspect
=> project("killer-app:teh-api")
To see a list of all projects defined in your Buildfile run buildr help:projects.
Running Project Tasks
Most times, you run tasks like build or package that operate on the current project and recursively on its sub-projects. The “current project” is the one that uses the current working directory. So if you’re in the la-web/src directory looking at source files, la-web is the current project. For example:
# build killer-app and all its sub-projects
$ buildr build

# switch to and test only teh-impl
$ cd teh-impl
$ buildr test

# switch to and package only la-web
$ cd ../la-web
$ buildr package
You can use the project’s full name to invoke one of its tasks directly, and it doesn’t matter which directory you’re in. For example:
# build killer-app and all its sub-projects
$ buildr killer-app:build

# test only teh-impl
$ buildr killer-app:teh-impl:test

# package only la-web
$ buildr killer-app:la-web:package
Buildr provides the following tasks that you can run on the current project, or on a specific project by prefixing them with the project’s full name:
clean     # Clean files generated during a build
compile   # Compile all projects
build     # Build the project
upload    # Upload packages created by the project
install   # Install packages created by the project
javadoc   # Create the Javadocs for this project
package   # Create packages
test      # Run all test cases
uninstall # Remove previously installed packages
To see a list of all the tasks provided by Buildr run buildr help:tasks.
Setting Project Properties
We mentioned the group identifier, version number and base directory. These are project properties. There are a few more properties we’ll cover later on.
There are two ways to set project properties. You can pass them as a hash when you call define, or use accessors to set them on the project directly. For example:
define 'silly', :version=>'1.0' do
  project.group = 'acme'
end

puts project('silly').version
=> 1.0
puts project('silly').group
=> acme
Project properties are inherited. You can specify them once in the parent project, and they’ll have the same value in all its sub-projects. In the example, we only specify the version number once, for use in all sub-projects.
Resolving Paths
You can run buildr from any directory in your project. To keep tasks consistent and happy, it switches over to the Buildfile directory and executes all the tasks from there, before returning back to your working directory. Your tasks can all rely on relative paths that start from the same directory as the Buildfile.
But in practice, you’ll want to use the path_to method. This method calculates a path relative to the project, a better way if you ever need to refactor your code, say turn a ad hoc task into a function you reuse.
The path_to method takes an array of strings and concatenates them into a path. Absolute paths are returned as they are, relative paths are expanded relative to the project’s base directory. Slashes, if you don’t already know, work very well on both Windows, Linux and OS X. And as a shortcut, you can use _.
For example:
# Relative to the current project
path_to('src', 'main', 'java')

# the same using symbols
path_to(:src, :main, :java)

# Exactly the same thing
_('src/main/java')

# Relative to the teh-impl project
project('teh-impl')._('src/main/java')
Defining The Project
The project definition itself gives you a lot of pre-canned tasks to start with, but that’s not enough to build a project. You need to specify what gets built and how, which dependencies to use, the packages you want to create and so forth. You can configure existing tasks, extend them to do additional work, and create new tasks. All that magic happens inside the project definition block.
Since the project definition executes each time you run Buildr, you don’t want to perform any work directly inside the project definition block. Rather, you want to use it to specify how different build task work when you invoke them. Here’s an example to illustrate the point:
define 'silly' do
  puts 'Running buildr'

  build do
    puts 'Building silly'
  end
end
Each time you run Buildr, it will execute the project definition and print out “Running buildr”. We also extend the build task, and whenever we run it, it will print “Building silly”. Incidentally, build is the default task, so if you run Buildr with no arguments, it will print both messages while executing the build. If you run Buildr with a different task, say clean, it will only print the first message.
The define method gathers the project definition, but does not execute it immediately. It executes the project definition the first time you reference that project, directly or indirectly, for example, by calling project with that project’s name, or calling projects to return a list of all projects. Executing a project definition will also execute all its sub-projects’ definitions. And, of course, all project definitions are executed once the Buildfile loads, so Buildr can determine how to execute each of the build tasks.
If this sounds a bit complex, don’t worry. In reality, it does the right thing. A simple rule to remember is that each project definition is executed before you need it, lazy evaluation of sort. The reason we do that? So you can write projects that depend on each other without worrying about their order.
In our example, the la-web project depends on packages created by the teh-api and teh-impl projects, the later requiring teh-api to compile. That example is simple enough that we ended up specifying the projects in order of dependency. But you don’t always want to do that. For large projects, you may want to group sub-projects by logical units, or sort them alphabetically for easier editing.
One project can reference another ahead of its definition. If Buildr detects a cyclic dependency, it will let you know.
In this example we define one project in terms of another, using the same dependencies, so we only need to specify them once:
define 'bar' do
  compile.with project('foo').compile.dependencies
end

define 'foo' do
  compile.with ..lots of stuff..
end
One last thing to remember. Actually three, but they all go hand in hand.
Self is project Each of these project definition blocks executes in the context of that project, just as if it was a method defined on the project. So when you call the compile method, you’re essentially calling that method on the current project: compile, self.compile and project.compile are all the same.
Blocks are closures The project definition is also a closure, which can reference variables from enclosing scopes. You can use that, for example, to define constants, variables and even functions in your Buildfile, and reference them from your project definition. As you’ll see later on, in the Artifacts section, it will save you a lot of work.
Projects are namespaces While executing the project definition, Buildr switches the namespace to the project name. If you define the task “do-this” inside the teh-impl project, the actual task name is “killer-app:teh-impl:do-this”. Likewise, the compile task is actually “killer-app:teh-impl:compile”.
From outside the project you can reference a task by its full name, either task('foo:do') or project('foo').task('do'). If you need to reference a task defined outside the project from within the project, prefix it with “rake:”, for example, task('rake:globally-defined').
Writing Your Own Tasks
Of all the features Buildr provide, it doesn’t have a task for making coffee. Yet. If you need to write your own tasks, you get all the power of Rake: you can use regular tasks, file tasks, task rules and even write your own custom task classes. Check out the Rake documentation for more information.
We mentioned projects as namespaces before. When you call task on a project, it finds or defines the task using the project namespace. So given a project object, task('do-this') will return it’s “do-this” task. If you lookup the source code for the compile method, you’ll find that it’s little more than a shortcut for task('compile').
Another shortcut is the file method. When you call file on a project, Buildr uses the path_to method to expand relative paths using the project’s base directory. If you call file('src') on teh-impl, it will return you a file task that points at the teh-impl/src directory.
In the current implementation projects are also created as tasks, although you don’t invoke these tasks directly. That’s the reason for not using a project name that conflicts with an existing task name. If you do that, you’ll find quick enough, as the task will execute each time you run Buildr.
So now that you know everything about projects and tasks, let’s go and build some code.